For a huge number of businesses, Salesforce is the gold standard for customer relationship management (CRM) software. It comes with all the features teams need to manage their sales pipeline and efficiently close deals with clients.
But what about team communication? That’s where Slack, the disturbingly popular team chat app, comes in. It’s not just aesthetically pleasing, it also makes it incredibly easy for teams to instant message, share files, and send voice messages.
Getting these apps to interact with one another can help you supercharge all your sales work. By connecting the pair through Zapier, you can easily automate the busywork that comes with managing your customer relationships and your team communication.
Skip ahead
Popular ways to integrate Salesforce with Slack
There are loads of ways you can integrate Salesforce with Slack. If there’s a niggly, manual task you do every day (like notifying your team members in Slack when you get a new lead in Salesforce), you can easily automate it to clear up your to-do list. Here are some of the most popular ways to automate Salesforce and Slack.
To get started with a Zap template—what we call our pre-made workflows—just click on the button, and we’ll guide you through customizing it. It only takes a few minutes. You can read more about setting up Zaps here.
Get Slack notifications for new Salesforce records
You know the golden rule when it comes to sales: you should always follow up fast with warm leads. That’s why any time you get a new lead in Salesforce, it’s likely that you’ll want to hand that lead over to a member of your sales team right away. The same goes for any activity in Salesforce, be it a new opportunity, task, or other kind of record. But if you find yourself repeatedly checking Salesforce several times a day and then manually notifying team members in Slack, that’s not an ideal process.
With these Zaps, you can automate this busywork and keep your team up to date on your pipeline, helping you close more deals at a faster pace.
Get Slack notifications for updated records in Salesforce
Want to keep your team informed whenever something changes or a field gets updated with new information in Salesforce? Or perhaps you want to let stakeholders know whenever opportunities are closed. That way, your whole team will have access to the latest updates on important records and can act on your sales pipeline right away.
Set up these workflows to do the heavy lifting for you, so you never have to worry about typing up lists of updates or tagging team members again.
Get Slack notifications for new outbound messages
Your customers (and prospects!) probably use a whole range of different channels to get in touch with your business every day. It’s easy to lose track of their messages when it’s down to you to sign into different platforms to see them. With this Zap, whenever a new outbound message is triggered in Salesforce, Zapier will automatically send it to you in the Slack channel you choose. That way, no message slips through the cracks.
Integrate Salesforce with Slack
As you can see, there are lots of ways to integrate Salesforce and Slack using Zapier to better manage your sales pipeline. For this specific tutorial, we’re going to focus on just one of the workflows we mentioned above—sending a channel message in Slack for updated fields in records in Salesforce. You can use these same steps for however you’d like to connect Slack with Salesforce.
Before you begin
Before you create a Zap that integrates Salesforce with Slack, you’ll need to create a Zapier account if you don’t have one already. Don’t worry, creating an account is easy and free. Just head right here. You’ll also need Salesforce and Slack accounts.
Once you’re signed in, you can create new Zaps using the Create Zap button or by going to zap.new.
Step 1: Connect your trigger app
A Zap always consists of two parts:
-
The trigger: an event that starts a Zap.
-
The action: an event a Zap performs after it’s triggered. A single Zap can perform more than one action.
Depending on the workflow you’re setting up, your trigger app could be Slack or Salesforce.
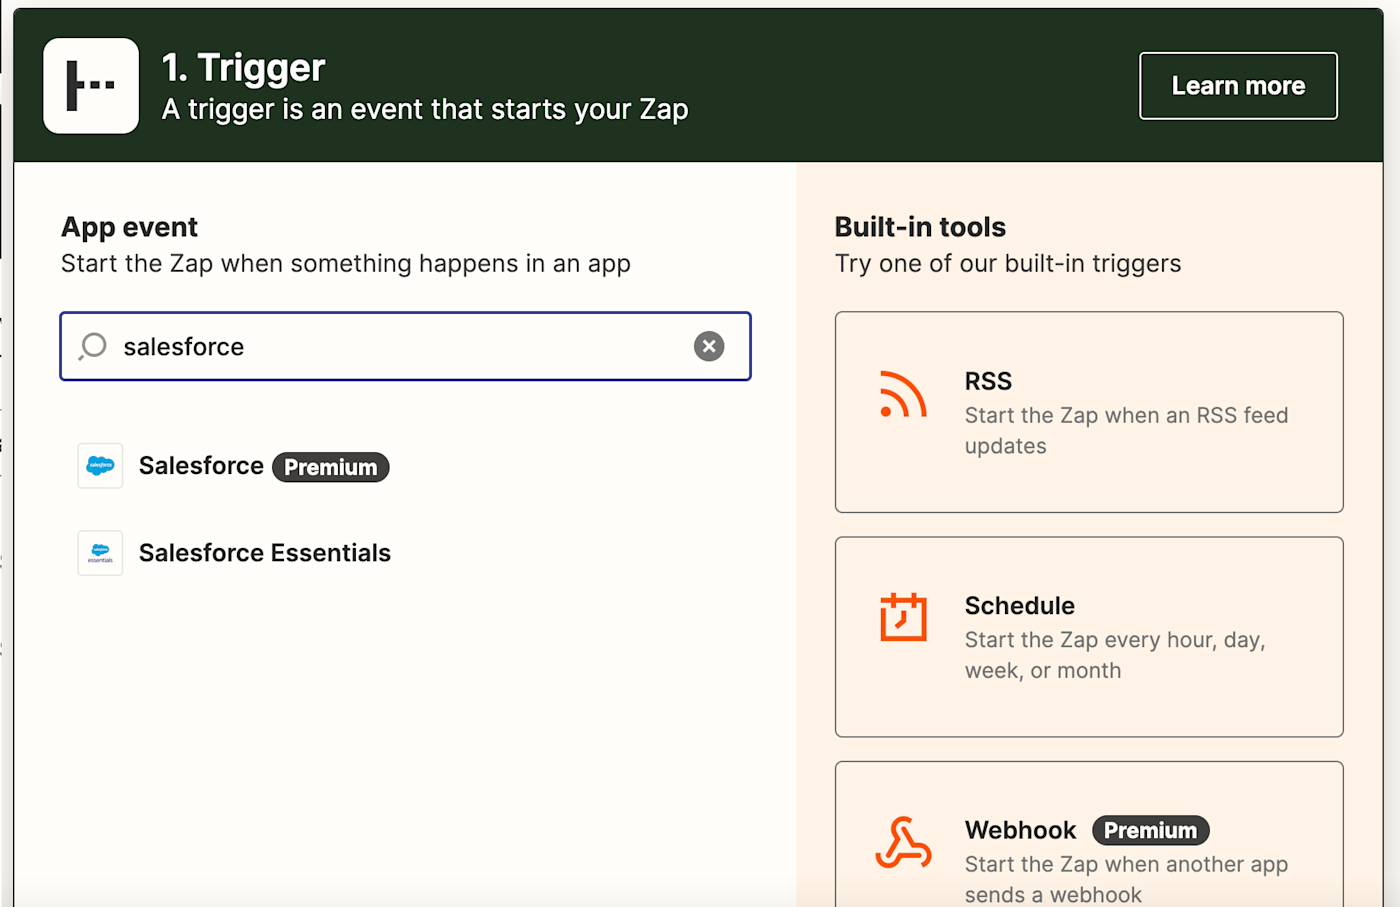
Search for and select your trigger app. In our example, we’ll search for Salesforce.
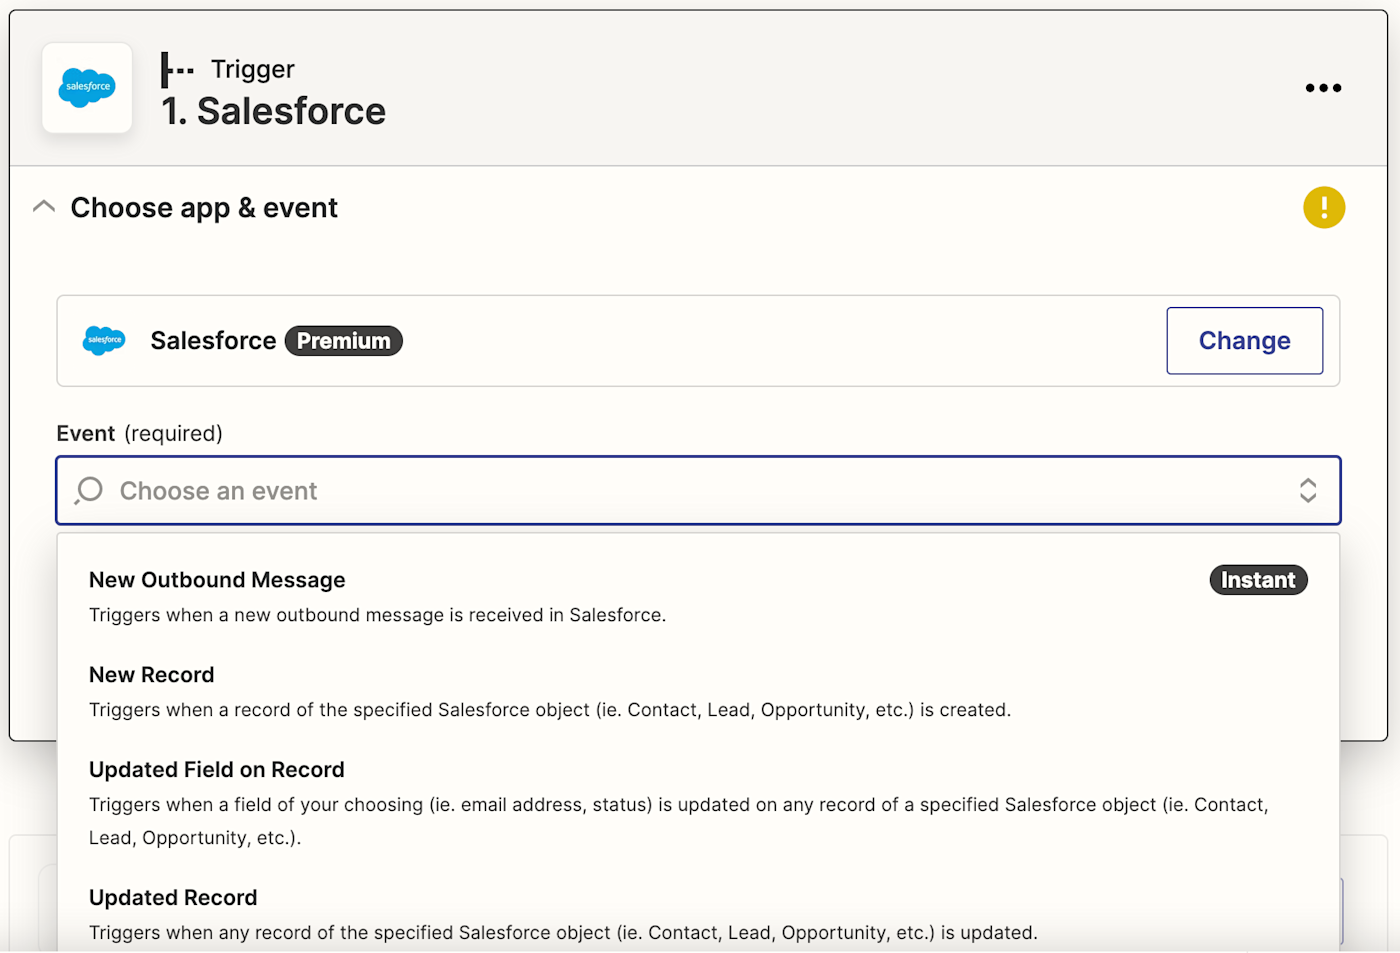
Then select your trigger event. If your trigger app is Salesforce, your Zap can trigger when there’s a new outbound message, a new record, updated field on a record, or an updated record.
If your trigger app is Slack, your Zap can trigger when a new message is posted in a channel, a new channel is created, a new mention is made, and more.
Want to know more about an app’s Zapier integration? Learn how you can use Zapier’s App Directory to find apps, get integration details, play with Zap combos, and more.
Select your trigger event and click Continue. We’re going to select Updated Field on Record for our example.
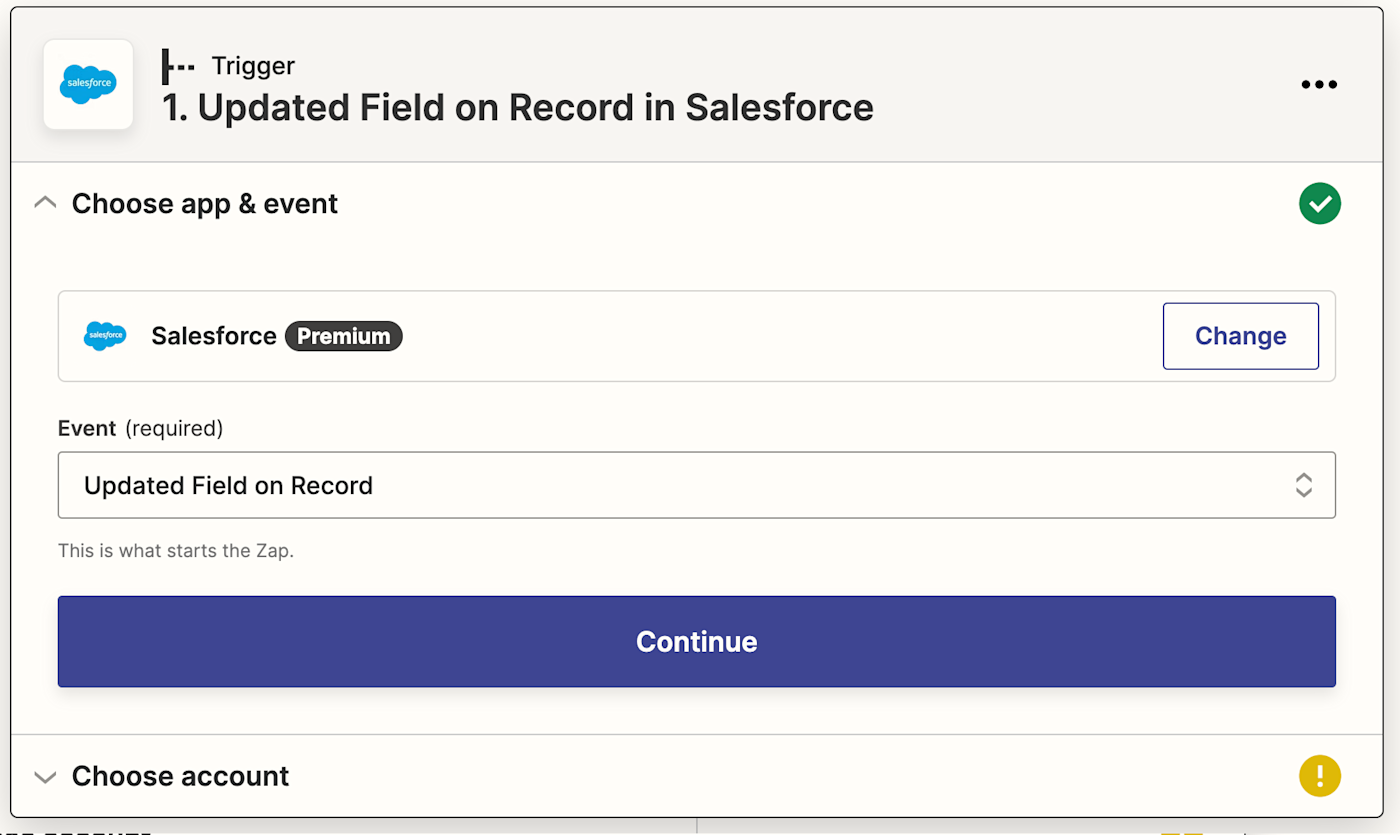
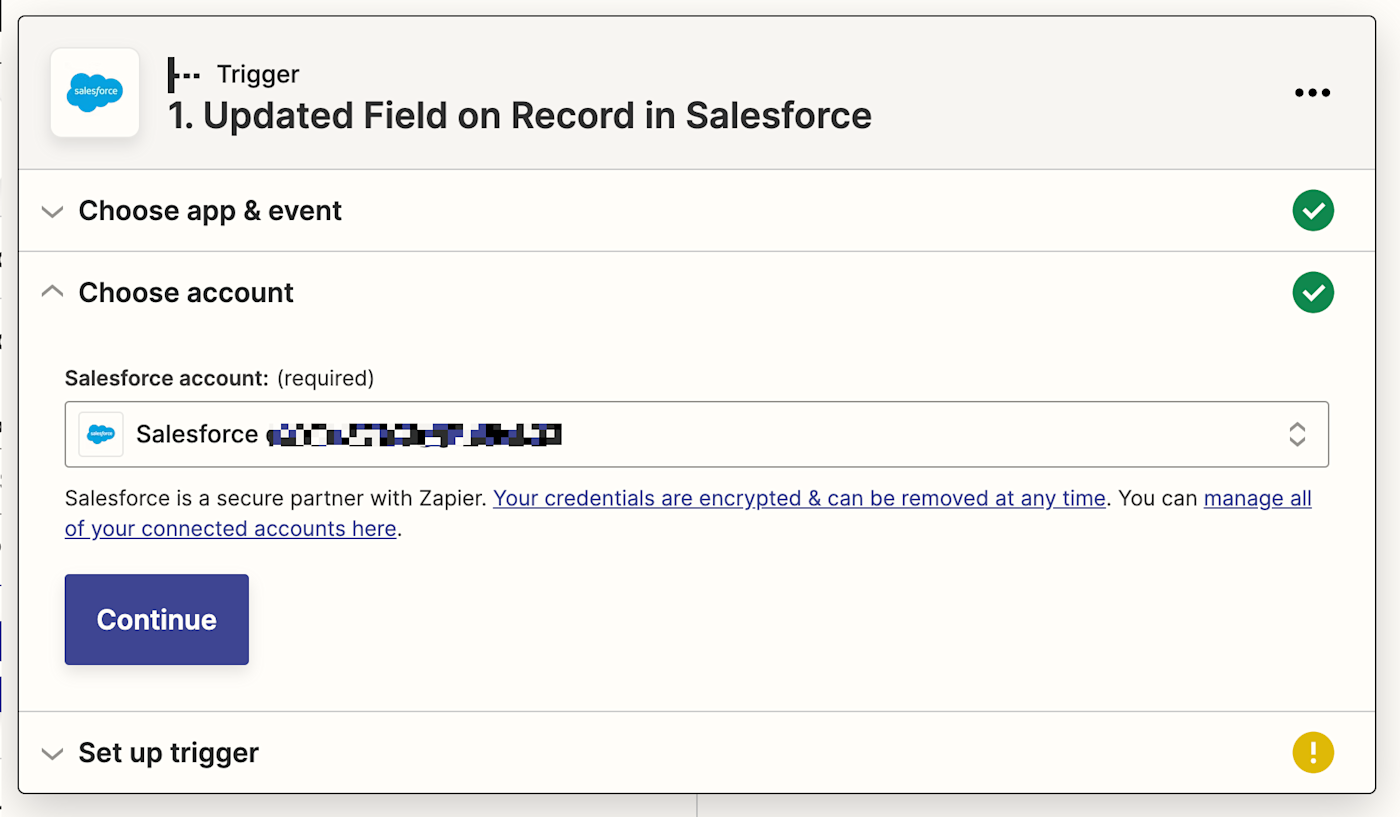
Next, connect your trigger app account to Zapier by clicking on the dropdown menu and selecting +Connect a new account. We’ll connect Salesforce in our example. You’ll need to give Zapier permission to access your account. Once you’ve connected your account, select it from the dropdown menu and click Continue.
For each app you connect, Zapier will ask for a general set of permissions which allows you to be flexible with your Zaps. The only actions Zapier takes on your app accounts are those a given Zap needs to accomplish what you’ve set up.
Next, set up your trigger step by filling in the trigger step fields. Depending on your trigger app and event, you’ll have different fields to customize. In our example, we’ll select the Salesforce object we want to use and which field will look for updates.
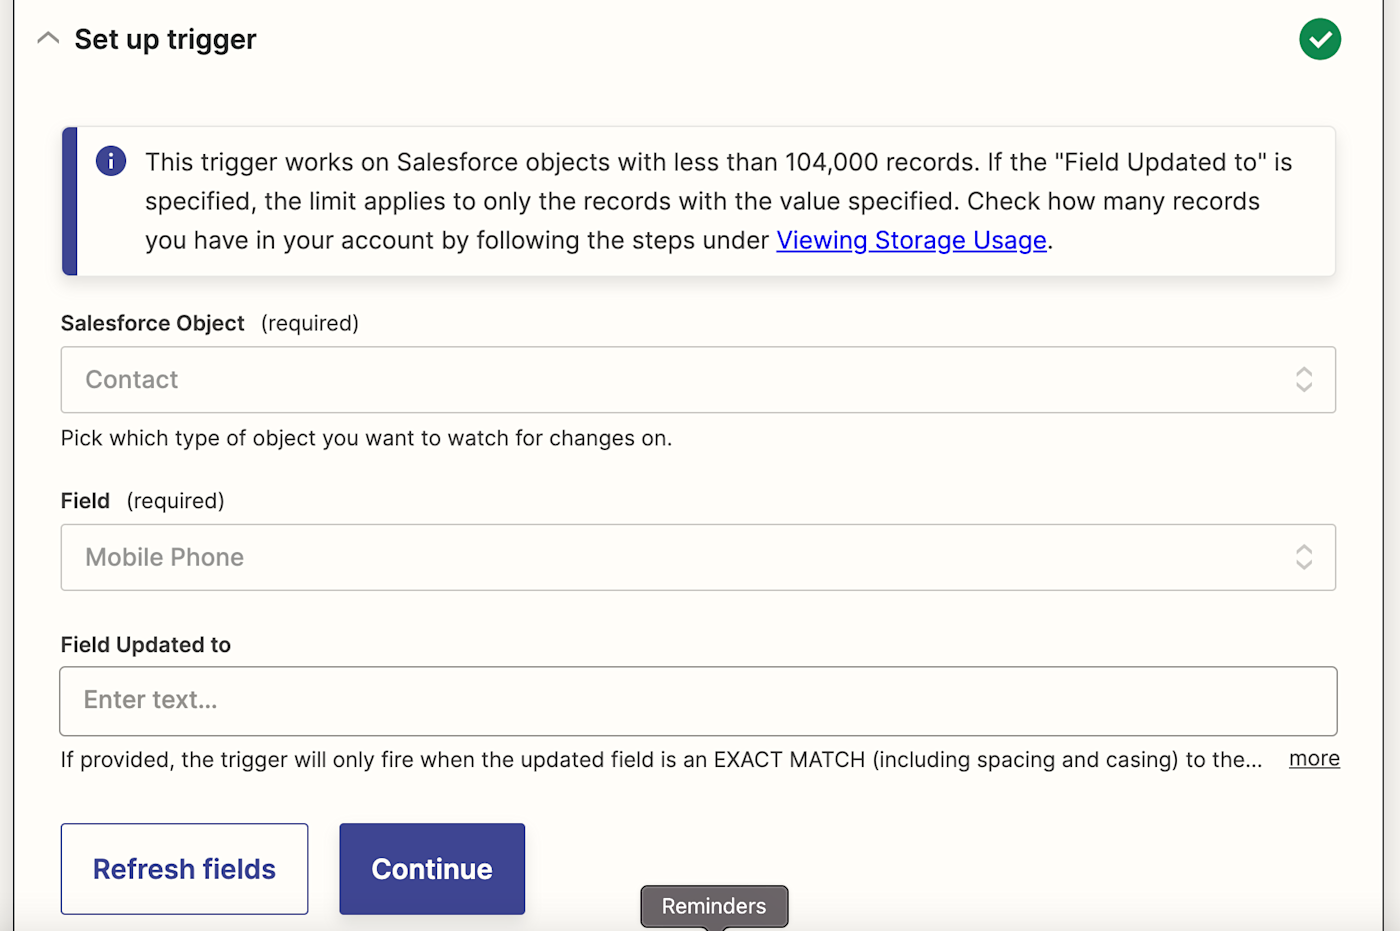
When you’re done customizing your trigger step, click Continue.
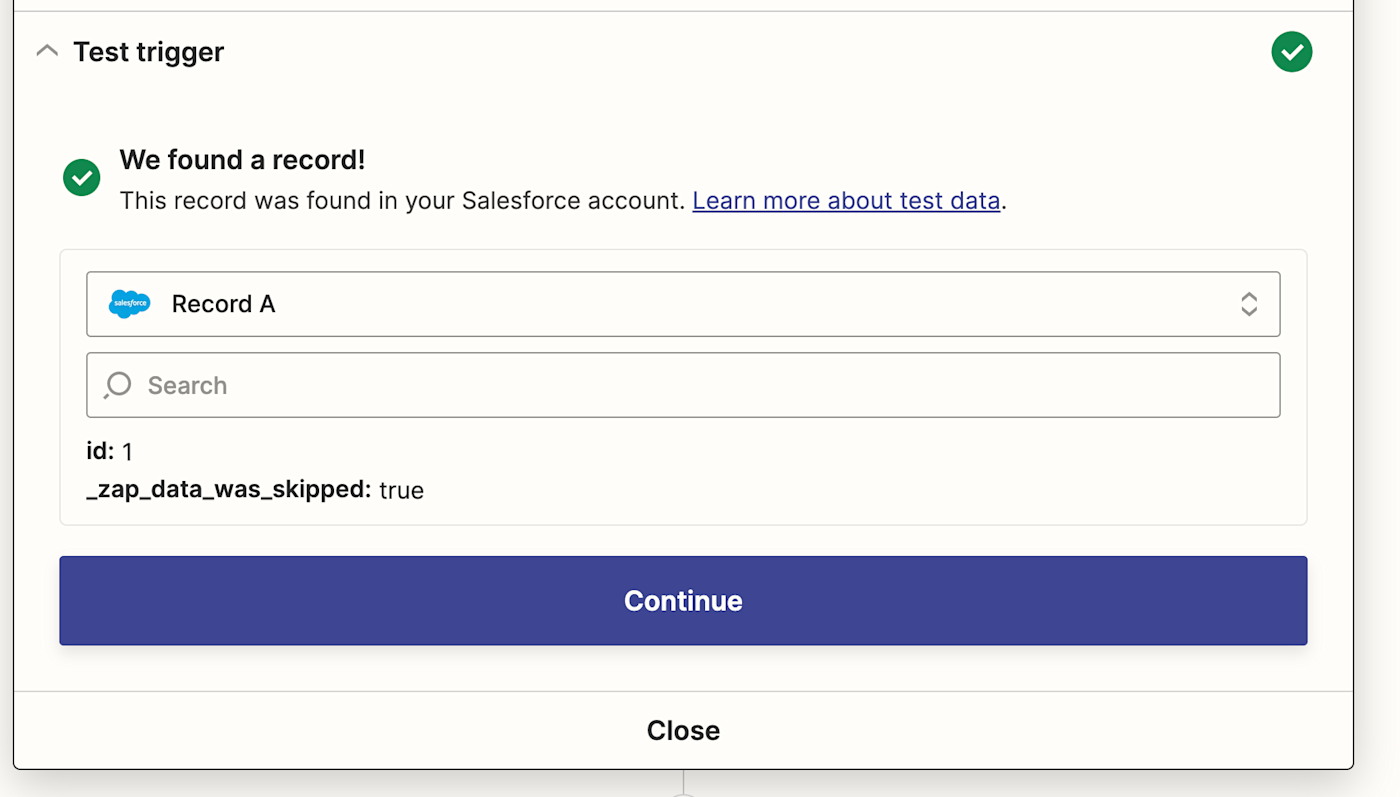
Next, click Test Trigger so Zapier will create a test event to make sure the trigger is working properly. Once the test runs successfully, click Continue.
Step 2: Connect your action app
In this next step, you’ll set up the action—the event your Zap will perform once it’s triggered. Start by searching for and selecting your action app. We’ll use Slack in our example.
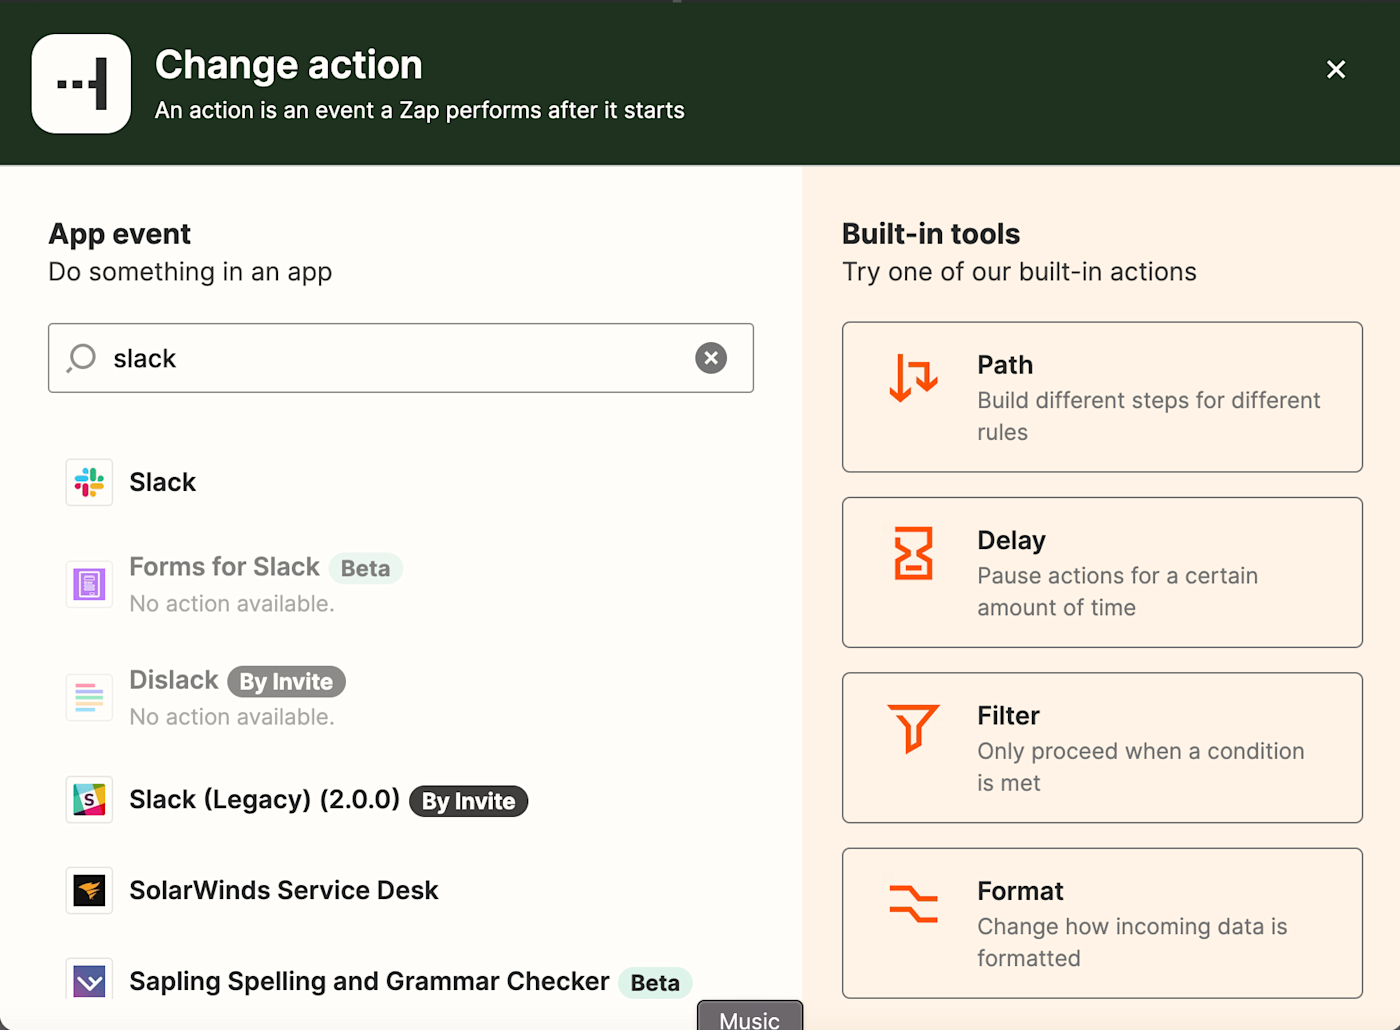
Next, choose your action event. If your action app is Slack, your Zap can add a reminder, invite a user to a channel, send a channel message, and more.
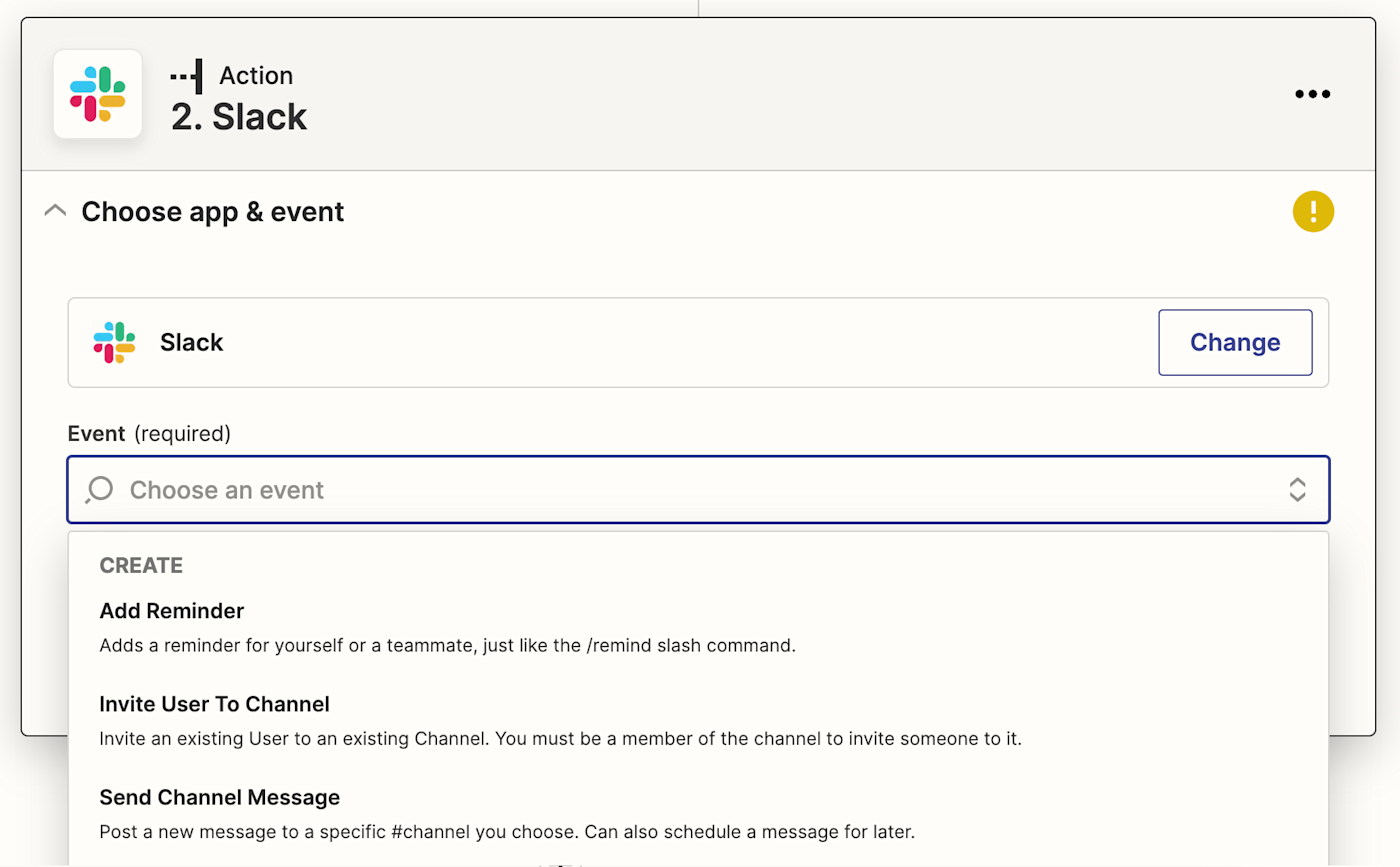
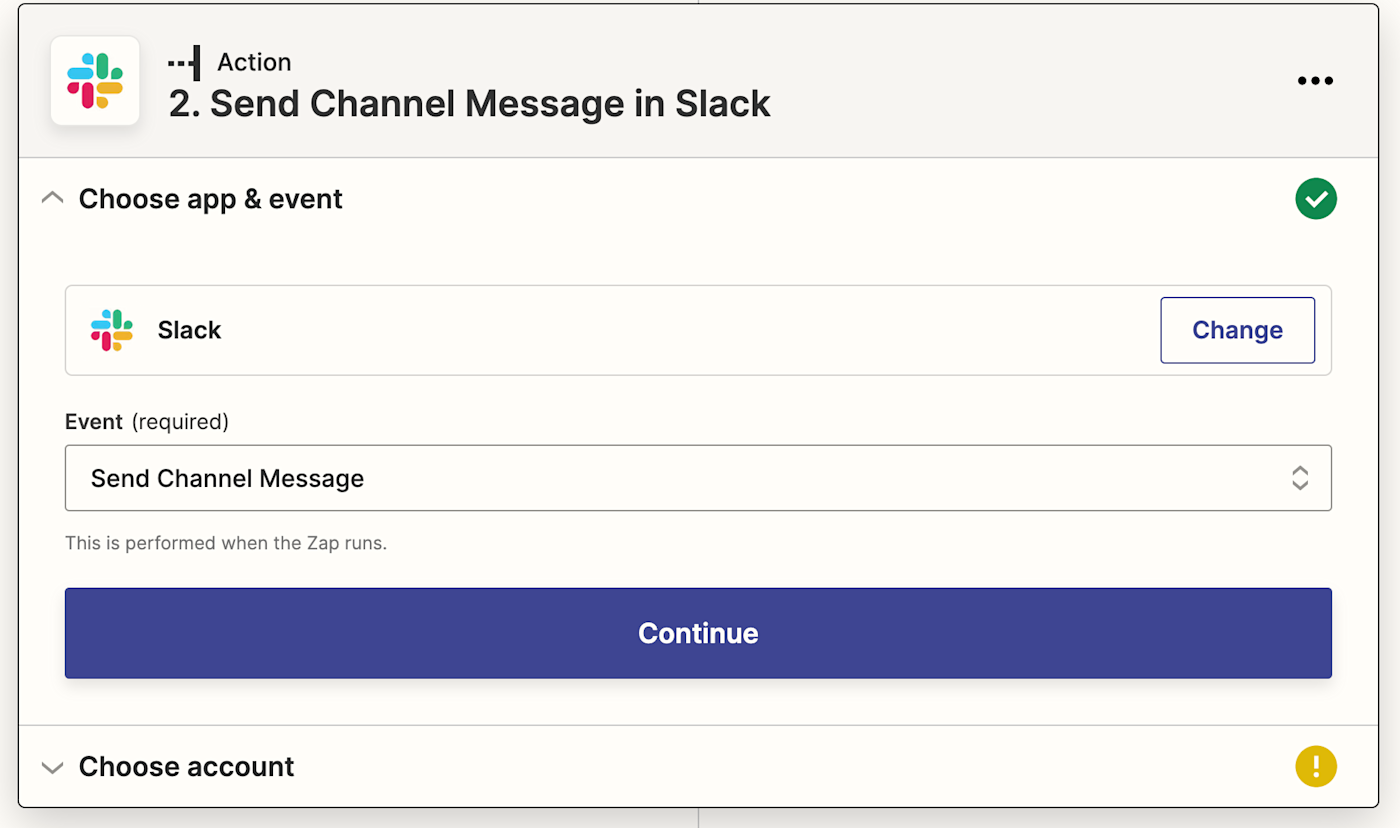
Select your action event and click Continue. We’re going to select Send Channel Message for our example.
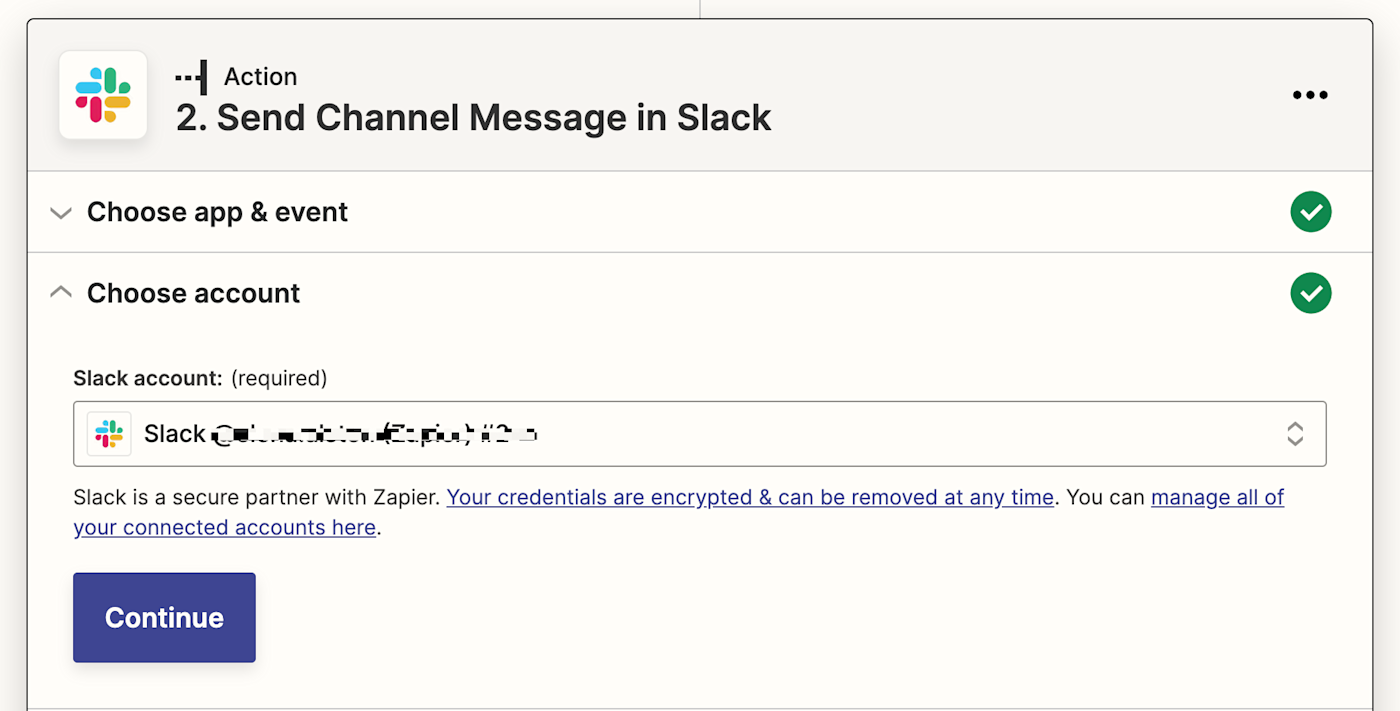
Next, connect your trigger app account to Zapier by clicking on the dropdown menu and selecting +Connect a new account. We’ll connect Slack in our example. You’ll need to give Zapier permission to access your account. Once you’ve connected your account, select it from the dropdown menu and click Continue.
Next, set up your action by filling in the action step fields. Depending on your action app and event, you’ll have different fields to customize. In our example, we’ll add which Slack channel to send the message to.
You can also customize your action step with data from your trigger step. For example, to pull in data from your Salesforce step—like the record field that’s been updated—click in the Message Text Field and select the data you’d like to use from the dropdown.
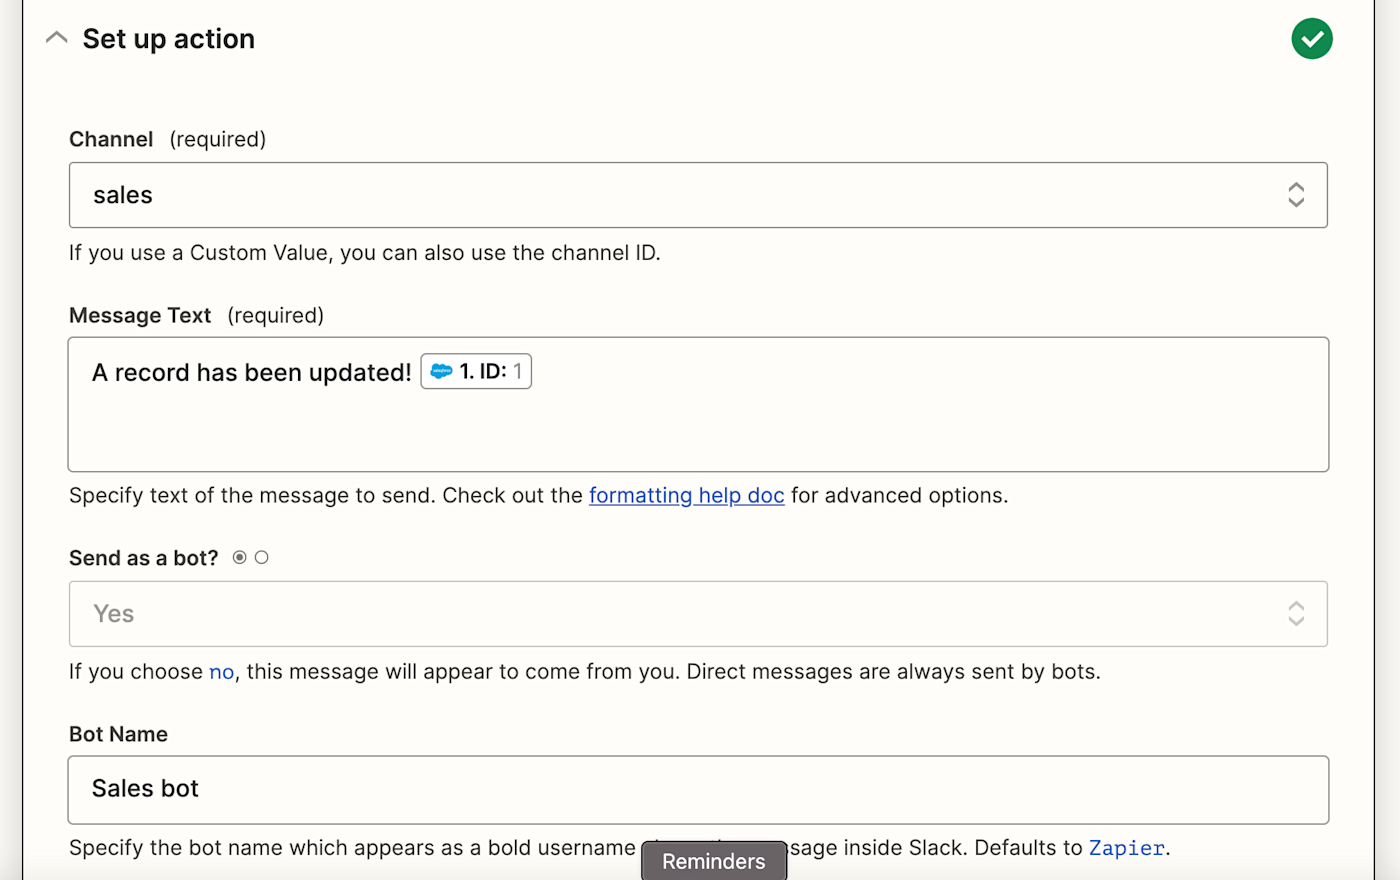
Once you’ve customized your action step how you’d like, click Continue.
Now it’s time to test your action. When you click Test & Review or Test & Continue, Zapier will send test data to your action app. In our example, Zapier will send a Slack notification to our chosen Slack channel according to how we set the notification up. We always recommend testing your Zap to check if your step looks ok. But if you’d rather skip the test, just click Skip Test in the bottom-right corner.
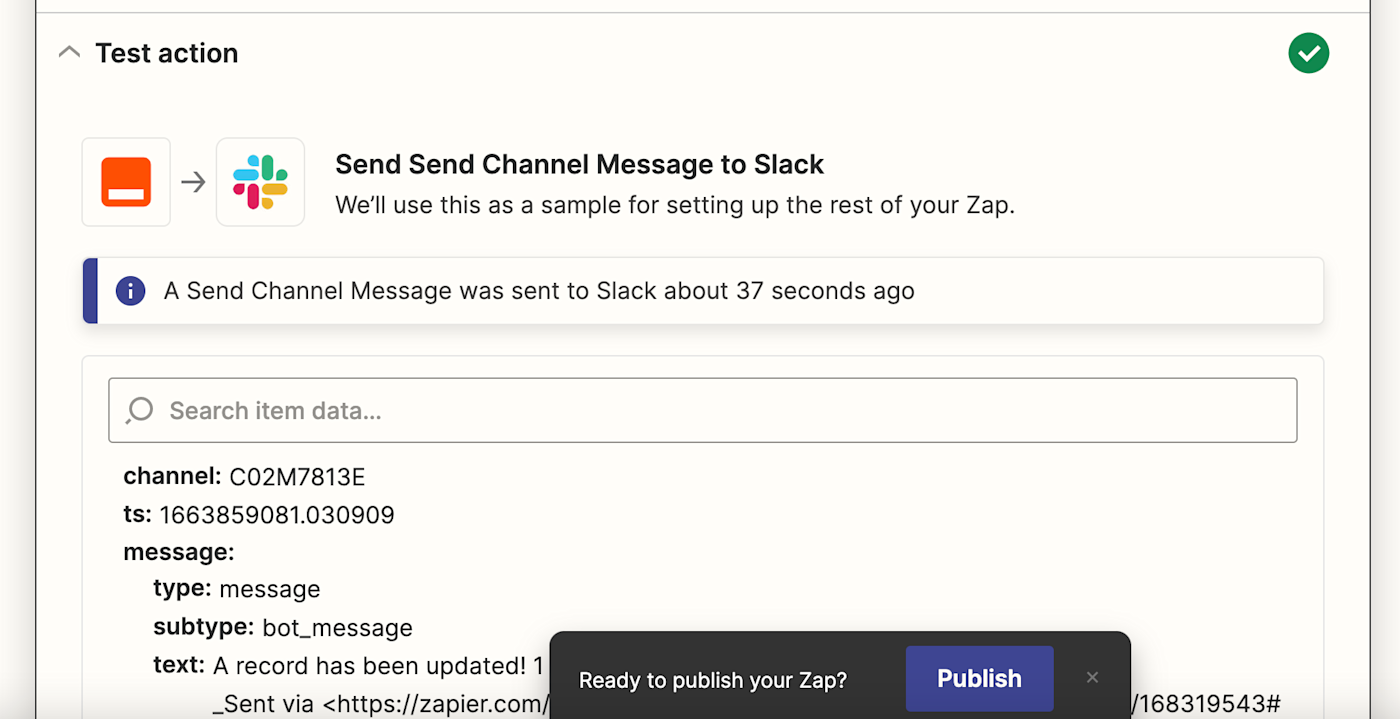
Once everything looks good, your Zap is ready!
Automate your sales pipeline to close more deals
Managing your sales pipeline, dealing with customers, and ensuring that leads go to the right sales reps at the right time is no easy feat. That’s why keeping everyone in the loop is an absolute must to close more deals. We’ve shown you some of the most popular ways to automate Slack and Salesforce to help you streamline this process, but this is only the start of all you can do. That’s why we recommend you experiment and try what works best for your workflows.
[adsanity_group align=’alignnone’ num_ads=1 num_columns=1 group_ids=’15192′]
Need Any Technology Assistance? Call Pursho @ 0731-6725516


