
Apps with built-in capitalization tools work great when you’ve just written something and realize you need to switch the case. But things can get tricky when you’re moving text between different apps and need to make a switch.

If your copy is in other business tools—like your newsletter manager or an email draft—but you need to tweak the case before you share it with another app, don’t try to change each letter yourself. Here’s how you can use Zapier’s built-in Formatter tool to automatically convert text case when sending copy from one app to another.
This workflow requires you to use Formatter, a built-in Zapier tool available to users on a paid plan or during a trial period.
Table of contents
Zapier is the leader in no-code automation—integrating with 5,000+ apps from partners like Google, Salesforce, and Microsoft. Build secure, automated systems for your business-critical workflows across your organization’s technology stack. Learn more.
How can you convert text case with a formatter step?
Formatter is one of Zapier’s built-in tools for Zaps. When the information from an app isn’t in the format you need, a formatter step can transform it into something you can use in later Zap steps.
We’re just going to focus on one Formatter function for now—Text (and specifically the Transform feature of Text)—though there’s a lot more you can do with it.
By selecting the Text action in a formatter step, you can do lots of different things with the text you receive from your trigger app—like find and replace text, convert text to HTML or Markdown, and more. Right now, we’re going to show you how to convert the case of text received in one app—such as lowercasing or capitalizing it—so you can add it to another app in the right format. Once you’ve set it up, your formatter step will do this for you automatically every time your Zap runs.
Before you begin
We’ll assume that you’re a little familiar with how Zapier works. And if you aren’t, don’t worry: It’s free to sign up for a Zapier account. We also have a guide to help you get up to speed on Zap basics. You’ll need to be in the Zap editor for this tutorial, where you can create Zaps from scratch.
You should also have your Zap created to the point where you need to convert your text case.
In our example, we need to change the capitalization for any new blog posts we’ve written in Google Docs when we publish them in WordPress. If you’re capturing your original text from another app, that’s fine. Just select that app as the trigger and keep following along. We’ll put our formatter step right after our trigger—the event that starts our Zap.

How to convert text case with a formatter step
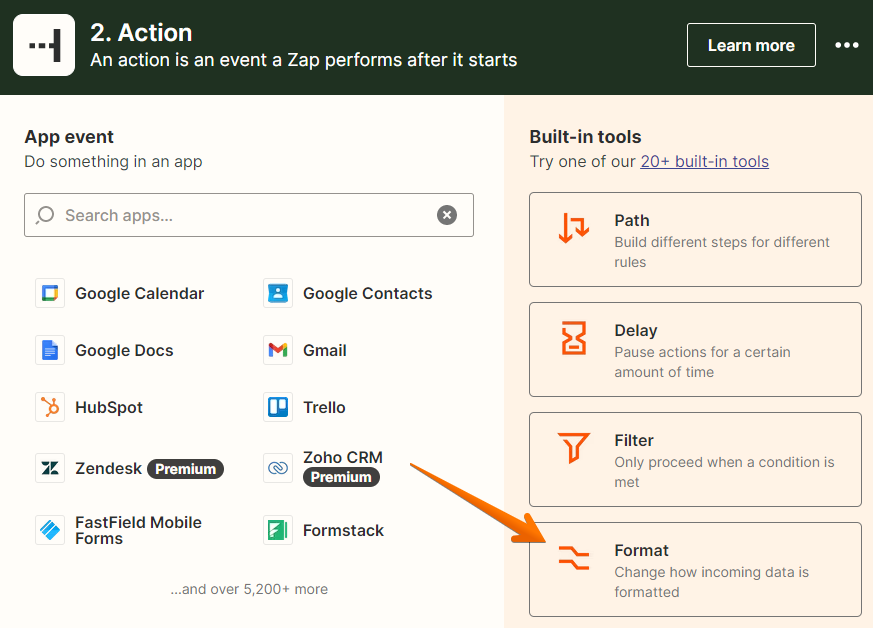
Click the plus sign to add a step to your Zap. Then, select Format on the right-hand side.
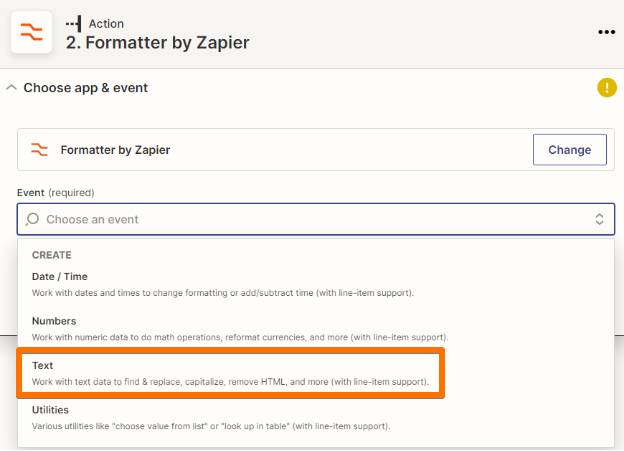
Select Text under the Event dropdown, and click Continue.
In the Transform menu, you can choose from a variety of ways to format your text. Here are the different ways you can reformat your text and what they mean:
-
Capitalize: Capitalize the first character of every word.
-
Lowercase: Make every character in the text lowercase.
-
Uppercase: Capitalize every character in a text field.
-
Titlecase: Capitalize the first character of every word, except for those with fewer than 4 characters.
-
Pluralize: Pluralize any English word (e.g., frog turns into frogs, child turns into children).
-
Replace: Replace any character, word, or phrase in the text with another word or phrase.
For our example, we want to capitalize the title of our articles in Google Docs, so we’ll select Titlecase from the Transform dropdown.

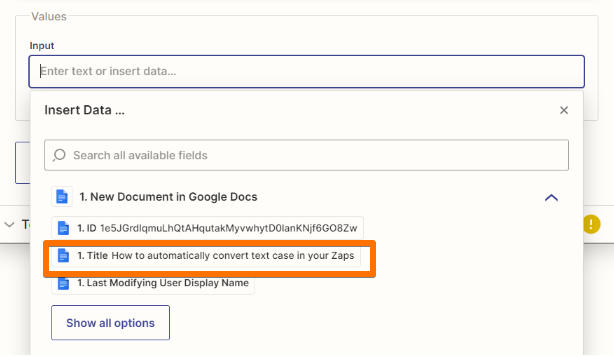
Now you need to select the input, which is the text you want to format. Click inside the Input field, and select the text from your trigger app that you want Zapier to capitalize correctly. In our example, we can see data from a new document added to our Google Docs account, including its title. We’ll select the title for our input.
Click Continue.
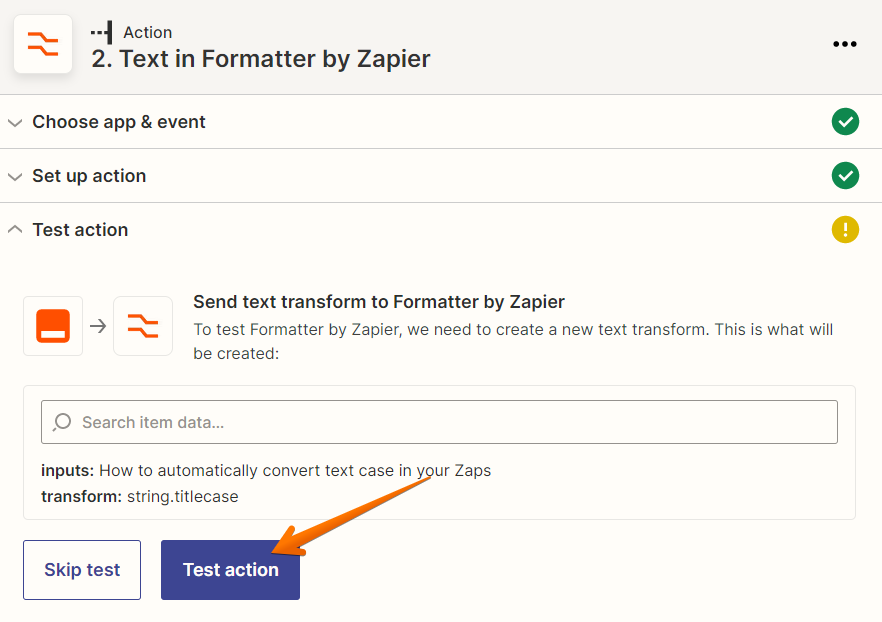
You’re now ready to test the formatter step. You could skip the test, but we highly recommend testing it so you can preview and make any changes. You’ll use this test to finish creating your Zap.
Click Test action.
Then, check the output line to make sure your title was converted correctly. You should see your title properly capitalized and ready to add to your action app.

Map your formatted text
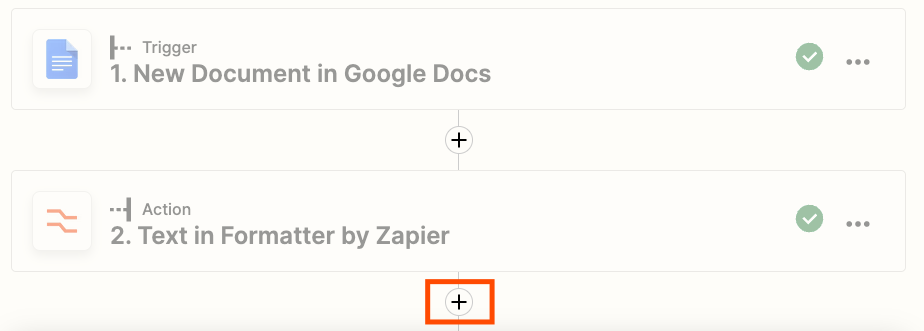
Now it’s time to add the output of your formatter step to another app. Click the plus-sign below your formatter step to add your action app.
Then search for and select your action app and event. We’re going to select WordPress for our action app and Create Post for our event because we want to create a new WordPress post from our Google Doc with our new, reformatted title.
Once you’ve selected your action app and event, you’ll need to connect your action app and set up the action step fields how you’d like them to achieve your desired action.
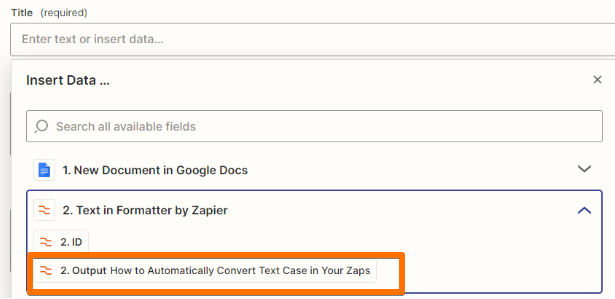
To add the results of your formatter step, click in the field where you’d like to add your reformatted text. In our example, we’ll click in the Title field. Under Insert Data, you’ll see a list of options.
Select Output to add your formatted text to the field. In our example we can see the title text from our Google Doc that’s been changed to title case.
Next, finish setting up your action step.
We added the content from the body copy from our Google Doc to the Content field in our WordPress step, so our WordPress post gets our original blog post copy and our reformatted title.
Finish creating your Zap, test it, and don’t forget to turn it on!
And that’s it! Converting text cases from one app to another is simple with Zapier’s Formatter tool. Use it for your social or blog posts or any other medium where getting the words right matters.
Do more with Formatter by Zapier
Want to automate more of your work with text? Check out the other tutorials in this series for more ways to use Formatter.
Need Any Technology Assistance? Call Pursho @ 0731-6725516

")
