Earlier this year, I upgraded from my iPhone 8 to a new iPhone 13 (which, I know—already out of date). I eagerly spent an hour or so adjusting the settings so they met my individual preferences.

Using custom objects in Salesforce is a little bit like that hour of tinkering. Just like an iPhone, Salesforce comes with out-of-the-box settings that might work for some users, but to have your device truly fit your needs, you need to spend some time customizing it. Additionally, consider enrolling in a Salesforce training to deepen your expertise in this valuable platform.
Custom objects will help your team get the most out of Salesforce, so let’s have a look at what they actually are, when you might want to use them, and how to create them.
What is a custom object in Salesforce?
To understand what a Salesforce custom object is, you first need to wrap your head around the idea of objects as a whole. The easiest way to think of an object is as a spreadsheet: it provides the structure by which you organize and view data.
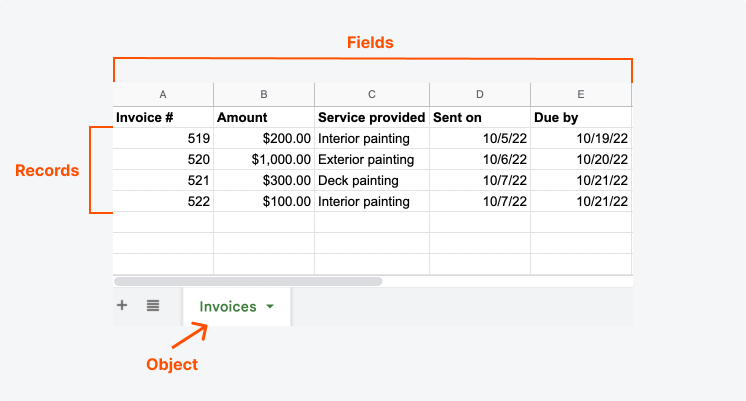
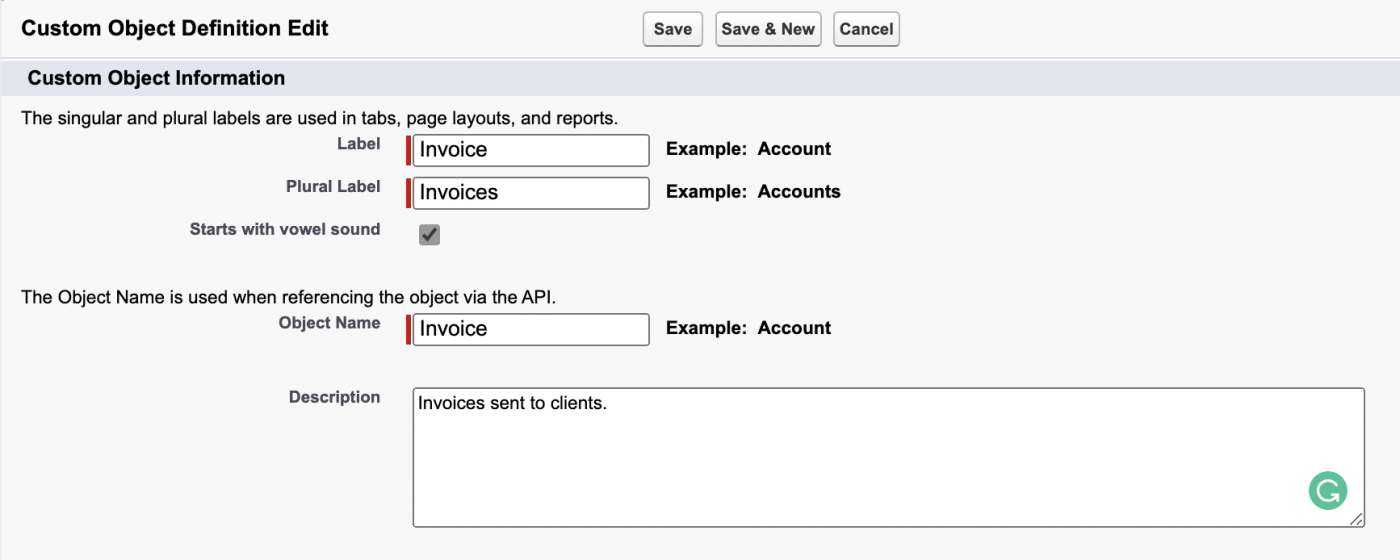
In the example above, “Invoices” is the object. That makes the columns—invoice number, amount, service provided, sent on, and due by—the fields (the type of data collected in each object). And each row is an individual record.
Now, there are two main types of objects in Salesforce.
-
Standard objects are the objects that are included in Salesforce by default. These include accounts, cases, contacts, and opportunities—the kind of information that almost every organization is keeping tabs on in Salesforce.
-
Custom objects go beyond what comes out of the box. They’re objects you create to handle the specific needs of your organization or industry.
That’s pretty much it. Objects are containers for your information, and custom objects are the containers you build yourself to suit your own specific needs.
Once you’ve created a custom object, you’ll be able to associate it with any record you want. (Also worth noting: there are Salesforce custom object limits. You can only have 3,000 custom objects per organization, so use them wisely.)
When to create a custom object
So how do you know when you should go through the trouble of creating a Salesforce custom object? Let’s use an example.
Winston’s Wonderful Painting Co. uses Salesforce to keep track of their leads and customers, but they also use it to track invoices and understand whether or not customers have paid. Invoices isn’t a standard object in Salesforce. So if Winston’s Wonderful Painting Co. wants to see if a customer has paid each time they view the contact in Salesforce, then they’ll need to create a custom object for invoices.
If the data you’re keeping track of is something that will only apply to a record (the customer) once—like an address, for example—then you could just create a custom field, rather than a custom object. But since Winston’s Wonderful Painting Co. might work on multiple projects for the same customer (and would need to send multiple invoices), they’ll want to create a custom object.
How to create a custom object in Salesforce
Creating a custom object is actually quite simple. You’ll have to make sure you have the appropriate permissions within your organization to do it, but once you have that sorted, just follow these steps:
-
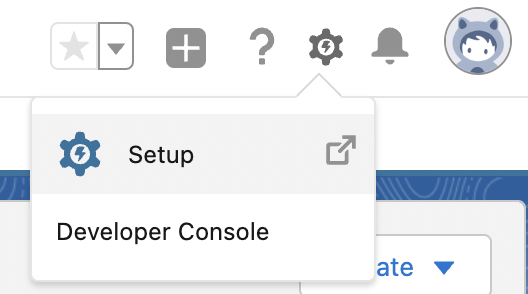
In your Salesforce org, click the cog icon, and select Setup.
-
Click the Object Manager tab.
-
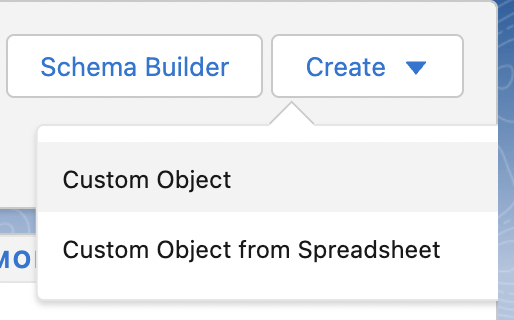
Click Create > Custom Object in the top-right corner.
-
In the Label section, enter whatever you want to call your custom object. The Object Name and Record Name fields will auto-fill with the same name.
-
For Plural Label, enter the plural form of your custom object name.
-
Scroll to the bottom of the page, and select the checkbox Launch New Custom Tab Wizard after saving this custom object. Selecting this box will add your custom object as a tab in Salesforce.

-
Click Save.
-
On the New Custom Object Tab page, click the Tab Style field, and choose a style. The style sets the icon to display in the UI for the object.
-
Click Next, Next, and Save.
That’s it! You have your first custom object.
Build Salesforce to fit your needs
Custom objects are just one of the many ways you can customize Salesforce to fit the unique needs of your business. While you’re here, check out some other Salesforce tips:
Need Any Technology Assistance? Call Pursho @ 0731-6725516

")
