When you are using PowerPoint for creating a presentation, you should make sure that content is designed in a visually appealing way as much as possible. There are numerous methods available for you to do it. Out of those methods, using smart art holds a prominent place. If you want to learn how to use smart art in the best possible way, you should take a look at this guide. Then you can understand how to receive impressive results out of smart art.

How to add smart art to your PowerPoint

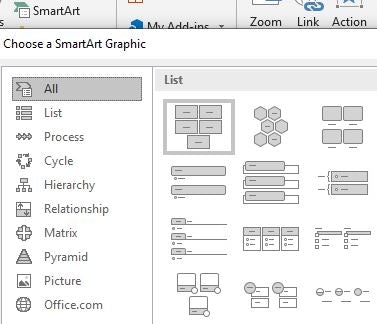
You can go to the presentation, go to the insert tab, and then pick the illustrations group. This is where you will be able to see a section named Smart Art. You can then select the dialog box named Choose a Smart Art. Then you can enter the layout and the type that you wish to get.
You can insert any text into the smart art as well. All you have to do is to click on the [Text] section in the Text pane. Then you should enter the text that you need to add. You can then copy text that you need to insert from a different program or location. You can click on the [Text] section in the text panel and then proceed with pasting your text.
In some of the instances, you might not be able to see the Text Pane. This is where you should click on the arrow control that you can find on the left-hand side of your smart art graphic. Then you can add text, such as title.
Next, you can click on the smart art graphic. Then you should enter the text. If you want to get the best results, you will need to make sure that you are using this option after adding all the boxes that you wish to enter.
Adding or deleting shapes to the Smart Art graphics
When you are using smart art, you will have the freedom to customize them according to your preferences. This is where you can easily add or delete the shapes in the smart art graphics.

The very first thing you should do is to click the specific smart art graphic, where you need to add another shape. Then you can click on the existing shape, which is located closest to the graphic that you want to add new. Now you can come to the Smart Art tools, where you will be able to navigate to the Design tab and click on the Create Graphic group. Then you should click on the next button, where you can Add Shape easily.

In case if you don’t see the Design or Smart Art Tools tab, you will need to make sure that you pick the Smart Art graphic. You might have to double click on the graphic, so that you will be able to open that in the Design tab.
Next, you can inset the shape. This is where you will have two options to consider. Either you can inset a shape after a selected shape or insert a shape before the shape that you have selected. You should click on “Add shape after” or “Add shape before” based on your needs.
You can even apply a unique smart art style into the graphic. To do that, you should click on the smart art graphic that you want to change. Then you should go to SmartArt tools and then click on the Smart Art Styles under Design tab. This is where you can pick the specific Smart Art style that you want.
Looking For Powerpoint Design Agency?
Call Pursho @ 0731-6725516
Telegram Group One Must Follow :
For Startups: https://t.me/daily_business_reads
#smart #art #PowerPoint #Tellit

