It’s a pain to create calendar events in bulk, but for things such as event planning or event tracking your team’s out-of-office time, it’s a job that has to be done.

Bring context to your calendar by connecting other apps
You can save yourself time by using Zapier to automatically create Google Calendar events from a Google Sheet. This is especially handy when you need to add events to Google Calendar in bulk or teammates are adding events to your calendar or a shared one.
With a single Zap—what we call our automatic workflows—you can automatically create Google Calendar events whenever a new row is added to a Google Sheet.
We’ll walk you through how to automatically create Google Calendar events from Google Sheets with a Zap—our word for an automated workflow. Click the button below, and follow along with the steps to set it up.
Here’s how to set it up:
-
Create your spreadsheet in Google Sheets (and make sure to sign up for Zapier if you haven’t already).
-
Connect your Google Sheets account and customize your trigger.
-
Connect your Google Calendar account and customize your calendar event.
-
Test your Zap and begin using it.
Zapier is a no-code automation tool that lets you connect your apps into automated workflows, so that every person and every business can move forward at growth speed. Learn more about how it works.
Before you begin
If you don’t have a spreadsheet already created, make one in Google Sheets and be sure to label your columns. This will be important when you set up your Zap. Be sure to have separate columns for the start date, start time, end date, and end time. Populate your spreadsheet with a few rows of information if it’s empty—you’ll use that data in Zapier to test your Zap.
If you don’t have real information to use, you can enter a sample submission using information you will easily recognize. For example, instead of typing in random characters, use fictional characters so you don’t confuse your test with a real submission. For our example, we’re going to be collecting time off requests to create a shared calendar of our team members’ time out of the office.
Connect Google Sheets
Click on the button above to get started, which will take you directly to the Zap editor. This is where you create and customize your automated workflows.
You’ll need a Zapier account to use the workflows in this piece. If you don’t have an account yet, it’s free to get started.
In the Zap editor, you set up your trigger step first. A trigger is an event that starts a Zap. You’ll be prompted to connect your Google Sheets account. If you’ve connected it before, select your account from the dropdown menu.

If it’s your first time connecting your Google Sheets account to Zapier, or your account isn’t listed, click +Connect a new account. You’ll need to give Zapier permission to access your account.
Once you’ve connected your account, click Continue.
For each app you connect, Zapier will ask for a general set of permissions which allows you to be flexible with your Zaps. The only actions Zapier takes on your app accounts are those a given Zap needs to accomplish what you’ve set up.
Customize your trigger
Next, you need to tell Zapier which spreadsheet and worksheet, if applicable, you want to trigger your Zap.
Under the Spreadsheet field, click on the dropdown to select your Google Sheets file. Then, click on the dropdown under the Worksheet field to select a specific Worksheet. If you don’t have multiple worksheets within a single file, it will usually be Sheet1.

Click Continue.
Test your trigger
Now it’s time to test our trigger. Zapier will find an existing row from your Google Sheet to use as sample data. This information will be used in later steps to finish building the rest of our Zap. Click the Test trigger button.

If your test information looks correct, click Continue. If something doesn’t look right, or if Zapier can’t find a row in your sheet, go back to the previous step and double-check that everything is correct.
Connect and customize Google Calendar
Next, we’ll customize the action step. An action is an event a Zap performs after it is triggered.
The template has already pre-selected our App and Action Event, so go ahead and click Continue.

Next, connect your Google Calendar account. If you’ve connected it to Zapier before, click on the dropdown menu to select your account. If your account isn’t listed, click +Connect a new account button and give Zapier permission to access your Google Calendar account. When you’re done, click Continue.
Customize your calendar event
Next, we’ll customize how we want our Google Calendar event to appear.
Click on the dropdown under Calendar to select the specific calendar you want Zapier to create an event in. For example, if you have a team calendar separate from your personal calendar.
The Summary field is the main calendar text that appears in any Google Calendar event. Click on Enter text or insert data. You can type in text, which will appear the same every time your Zap runs. If you’d like to use row information from your Google Sheet, select a Google Sheet field from the dropdown menu.

This is called field mapping. When you map a piece of data—such as a contact name—what you see in the editor is a placeholder. This placeholder data will only be used by our Zap when we test it. Once the Zap is running, real data from Google Sheets (or any app you select) will be used when your Zap runs.
Next, fill out the Description field with any text or Google Sheets fields you’d like.

Under Start Date & Time, select the fields you’d like to use from your Google Sheet from the dropdown menu. You can select more than one option. Do the same for the End Date & Time field.

Customize the remaining options how you like, for example, if you want reminders. When you’re finished, click Continue.
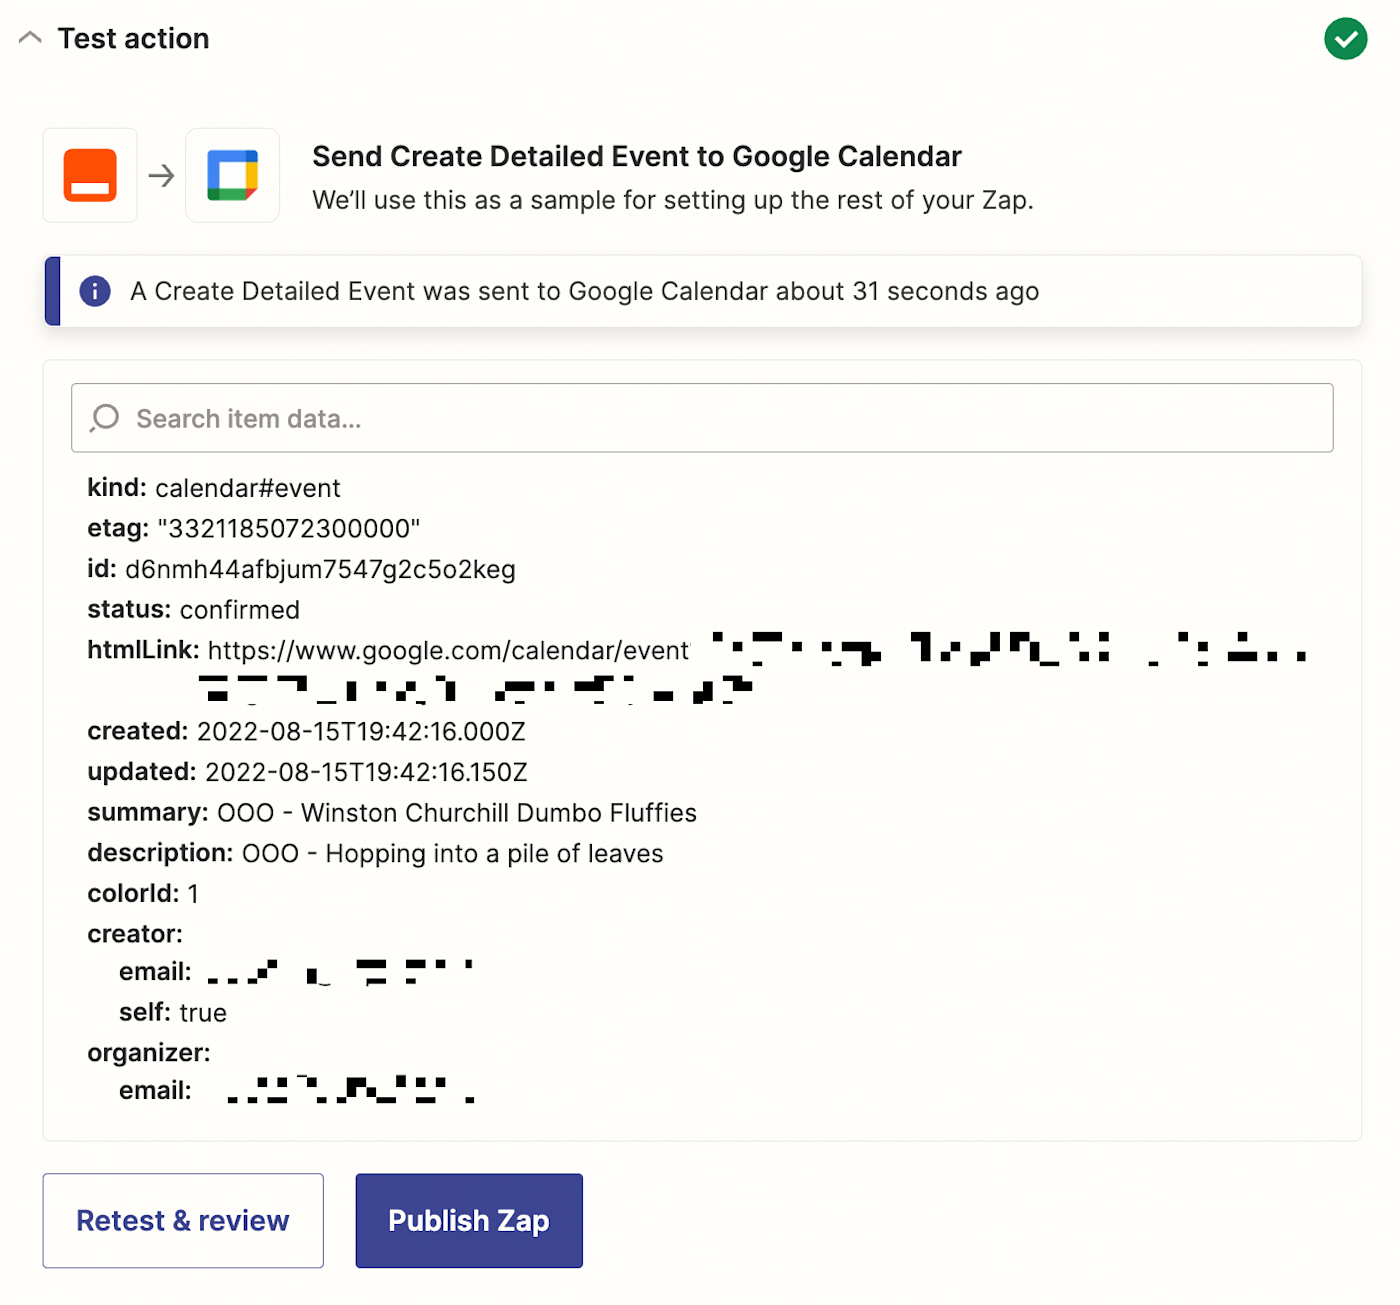
Test your Zap and begin using it
Now it’s time to test our Zap to make sure it works. Zapier will create a Google Calendar event using information from our Google Sheet.
You can skip this test if you’d like by clicking the Skip test button located at the bottom right corner. However, you should test your Zap to make sure your calendar event is created correctly. Click any of the test buttons to continue.

If the test was successful, you’ll see a message like this.
Open up Google Calendar and find your calendar event to ensure it looks correct. Once everything is set up correctly, you’re ready to begin using your Zap.
Your Zap will now automatically create Google Calendar events every time you add a new row to Google Sheets.
For more ways to automate your apps with Zapier, we recommend:
This piece was originally published in September 2017, written by Carlin Sack. It was substantially updated by Krystina Martinez in December 2020, and most recently updated in August 2022.
Need Any Technology Assistance? Call Pursho @ 0731-6725516


")